
Main Courses
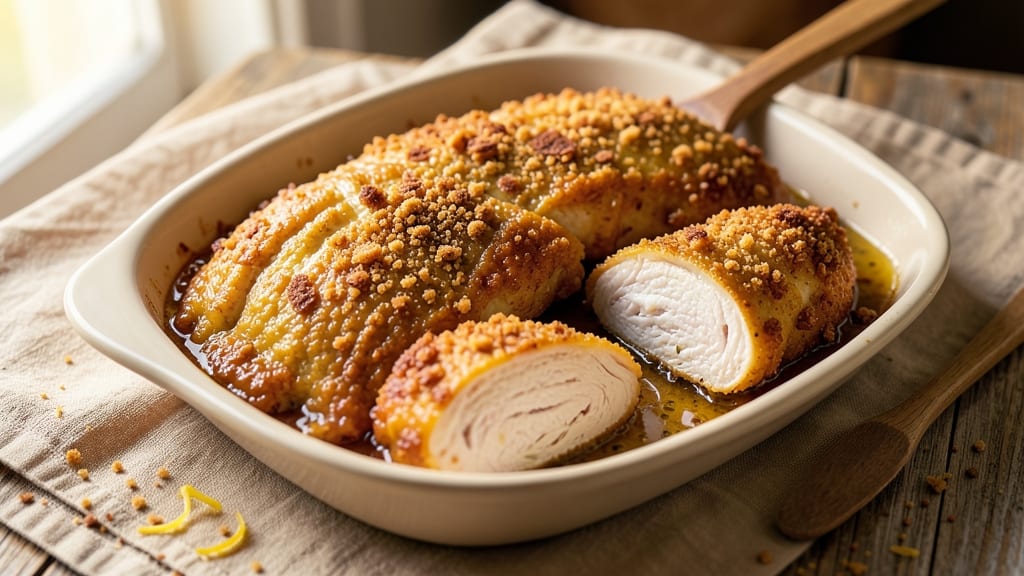
This baked chicken batter recipe delivers restaurant-quality crunch with tender, juicy centers—no deep-frying required. The secret lies in a triple-dredging technique that creates an irresistible golden crust while keeping the meat perfectly moist inside.
I've perfected this method over years of testing, ensuring crispy edges that stay that way even after baking.
The process starts with a simple batter mix of flour, eggs, and beer (or sparkling water for a lighter version), followed by two additional breading layers for maximum crunch. Baking at 425°F for 20-25 minutes transforms the chicken into crispy, bite-sized pieces that hold up beautifully on plates.
The beer adds subtle depth, while the triple coating guarantees that crunch factor you crave.
What you'll end up with is chicken so crispy it shatters slightly with each bite, yet remains tender inside—foolproof for weeknight dinners or holiday meals. The batter clings perfectly, creating a satisfying texture contrast that makes this dish impossible to resist.
Serve with tangy dipping sauces or fresh greens for a complete meal.
This recipe scales effortlessly for parties or meal prep, and the technique works with chicken tenders, wings, or even nuggets. The key is patience during the breading process and maintaining high heat in the oven. Let's get started on creating that perfect crunch every time.
Ingredients for baked chicken batter
Precision ingredients for that perfect triple-dredged crunch with juicy centers—every element matters for restaurant-quality results.
| Ingredient | Amount | Notes |
|---|---|---|
| Boneless, Skinless Chicken Breasts 🍗 | 1 ½ lb | Pounded to even thickness (1/4-inch) |
| All-Purpose Flour 🌾 | 1 cup | Sifted for smooth batter consistency |
| Large Eggs 🥚 | 2 whole | Room temperature for even coating |
| Light Beer 🍺 | ½ cup | Lager or pale ale preferred (or sparkling water) |
| Panko Breadcrumbs 🍞 | 2 cups | Japanese-style for maximum crunch |
| Cornstarch 🌽 | ¼ cup | For extra crispiness in final coating |
| Granulated Garlic Powder 🧄 | 1 tbsp | For subtle flavor depth |
| Dried Parsley Flakes 🌿 | 1 tbsp | For vibrant color and freshness |
| Diamond Crystal Kosher Salt 🧂 | 1 tsp | For seasoning and flavor balance |
| Ground Black Pepper 🌶️ | ½ tsp | Freshly ground for optimal flavor |
| Vegetable Oil Spray 🫒 | 1 tbsp | For light coating before baking |
| Lemon Wedges 🍋 | 4 whole | For serving and brightness |
| Fresh Parsley 🌿 | ⅛ cup | Chopped, for garnish |
The chicken breasts are the foundation—look for evenly sized pieces from the deli counter at Whole Foods or your local butcher for consistent thickness. Pounding them to exactly 1/4-inch ensures even cooking. The Panko breadcrumbs from Japanese markets or bulk bins create that signature shatter-crunch, while cornstarch in the final coating guarantees it stays crisp even after baking. For the beer, local craft lagers add subtle malt sweetness, but any pale ale or even sparkling water works in a pinch—just avoid dark beers that might overpower the delicate batter flavor. The flour should be sifted to eliminate lumps, and using Diamond Crystal kosher salt (not table salt) prevents over-salting the batter.
No beer on hand? Sparkling water with a splash of lemon juice mimics the light carbonation and acidity perfectly. Substituting regular breadcrumbs for Panko? Toast them first to enhance crispiness, but you'll lose that signature shatter. The dried parsley flakes can be swapped for finely ground dried basil if you prefer, though parsley's mild flavor lets the chicken shine. For extra crunch in the final coating, add crushed cornflakes or cereal to the cornstarch mixture. The lemon wedges aren't just for serving—their acidity brightens the final dish, so don't skip them even if they're not part of the baking process. Fresh parsley for garnish can be dried if needed, but fresh is ideal for that vibrant pop of color.
Prep the chicken immediately before breading to prevent drying. Store the Panko and cornstarch mixture in an airtight container for up to 2 weeks—it's perfect for quick breading sessions. The batter components (flour, eggs, beer) can be mixed ahead and refrigerated for up to 24 hours, but bring to room temperature before using. Baked chicken stays crisp for 2-3 hours at room temperature, making it ideal for meal prep—just reheat at 350°F for 10 minutes to restore crispiness. For large batches, freeze unbreaded chicken pieces on a tray before bagging—this prevents them from sticking during the breading process.
Why You'll Love This Recipe
- No-Fuss Setup: I swear by this recipe because it’s the kind of meal that doesn’t demand perfection—just a sheet pan, a bowl, and 15 minutes of hands-off time. The beer in the batter adds depth without extra steps, and the panko gives that just-baked crunch without frying a thing.
- Crispy-Creamy Magic: That golden crust from the panko and beer batter? It’s the real star. Inside, the chicken stays juicy while the outside gets addictively crispy—like a cross between fried and baked, but with zero guilt. (Yes, even on a Tuesday night.)
- Weeknight Workhorse: Between us, this is my go-to for busy nights, potlucks, or when I need something that feeds a crowd but doesn’t require a degree in cooking. Double the batter, halve the effort—it’s that simple.
- Budget-Friendly Leftovers: A single chicken breast stretches into three solid meals, and the batter costs pennies. Reheat slices in the toaster for a quick breakfast sandwich or toss cold pieces into salads—no one will guess they’re day-old.
Step-by-step instructions for triple-dredged crispy chicken
Master the triple-dredge technique for restaurant-quality crunch with a tender interior.
Prepare the Chicken and First Coating
Pound the 1.5 lb boneless, skinless chicken breasts between two sheets of plastic wrap to an even ¼-inch thickness using a meat mallet. This ensures even cooking and prevents dryness. Pat the chicken dry with paper towels—moisture is the enemy of crispy batter.
In a shallow bowl, whisk together the 1 cup all-purpose flour, 1 tbsp granulated garlic powder, 1 tbsp dried parsley flakes, 1 tsp Diamond Crystal kosher salt, and ½ tsp ground black pepper. Dredge each chicken breast in this mixture, pressing gently to adhere the coating evenly. Let the floured chicken rest for 5 minutes while you prepare the next coating.
Create the Beer-Egg-Wash and Second Coating
In a separate shallow bowl, beat the 2 whole large eggs until frothy. Add the ½ cup light beer (or sparkling water) and whisk until smooth. This mixture creates a light, airy barrier that helps the final breading stick perfectly. Dip each floured chicken breast into the egg mixture, allowing excess to drip off before transferring to the 2 cups panko breadcrumbs mixed with ¼ cup cornstarch. The cornstarch adds extra crunch to the final texture.
Press the panko mixture firmly against the chicken, ensuring complete coverage. Place the double-coated chicken on a wire rack set over a baking sheet—this prevents soggy bottoms by allowing air circulation. Repeat the process until all pieces are coated. Let the chicken rest for 10 minutes at room temperature before baking.
Apply the Final Coating and Bake
Lightly spray the triple-coated chicken with 1 tbsp vegetable oil spray—this creates a moisture barrier that enhances browning and crispiness. Arrange the chicken pieces on a parchment-lined baking sheet, spacing them 1 inch apart to allow for even air circulation. Preheat your oven to 425°F while the chicken rests.
Bake the chicken for 18-22 minutes, flipping once halfway through, until the exterior is deep golden brown and the internal temperature reaches 165°F. The triple coating should be crispy with no soft spots—tap the breading gently to test. If it sounds hollow, it's ready. If not, return to the oven for 2-3 minutes more.
Rest and Serve
Transfer the baked chicken to a cutting board and let it rest for 5 minutes before serving. This resting period allows the juices to redistribute, ensuring each bite remains moist and flavorful. Garnish with ¼ cup chopped fresh parsley and serve with the 4 lemon wedges for a bright, tangy contrast.
The result should be a piece of chicken with a shatteringly crisp exterior that gives way to a tender, juicy interior—the perfect balance of texture and flavor. Serve immediately while the coating is at its crispiest, and enjoy the satisfying crunch with every bite.
Pro Tips For Making Baked Chicken Batter
- Pound Chicken Thin: After cutting three batches too thick, I learned—pound those breasts to ½-inch thickness before dredging. The beer batter needs to cook through evenly, and thick chunks end up dry or undercooked while the edges burn. Use a rolling pin or meat mallet, and don’t skimp on the pressure.
- Chill the Batter Mixture: I used to rush straight to baking, and the panko would turn into a sad, greasy paste. Stir together the flour, beer, and eggs, then refrigerate for 15–20 minutes before dipping. This thickens the batter just enough to cling to the chicken without dripping off—no more gloppy, uneven coatings.
- Don’t Overcrowd the Pan: I crammed a whole sheet tray with chicken, thinking more = faster cooking. Bake in a single layer with at least 1 inch between pieces—crowding steams the batter instead of browning it. If your pan is small, work in batches, even if it takes longer. That crispy crust won’t happen if they’re stuck together.
- Use Cold Beer: Sounds weird, but it works: chill the light beer in the fridge for 30 minutes before mixing. Cold beer creates a tighter, more stable batter that holds its shape better during baking. Plus, it’s less likely to curdle when combined with the eggs—no one wants a lumpy coating. (Yes, even if you’re impatient like me.)
Flavor customization for this recipe
Spicy Kick Options
For heat lovers, add ½ teaspoon cayenne pepper or 1 teaspoon smoked paprika directly to the flour mixture. This infuses the batter with subtle warmth that contrasts beautifully with the crispy exterior.
I like using Penzeys brand for consistent quality—just start with a pinch to avoid overpowering the delicate chicken flavor. 🌶️
For a smoky-spicy variation, replace the dried parsley with 1 tablespoon chipotle powder in the final breading stage. This adds deep, smoldering heat that pairs perfectly with the beer's maltiness. Serve with a side of sriracha mayo for an extra kick at the table.
Herb Infusions
Swap out the dried parsley for 1 tablespoon dried thyme or 1 tablespoon dried oregano in the flour mixture for a Mediterranean twist. Fresh herbs like chopped chives or dill can also be mixed into the final breading for a bright, aromatic finish.
I find fresh dill particularly effective when combined with lemon wedges for a zesty contrast.
For a French bistro vibe, add 1 tablespoon dried tarragon to the flour mixture and finish with lemon zest in the final coating. This herb has a slightly sweet, anise-like flavor that complements the beer beautifully. Pair it with a white wine reduction sauce for an elevated dining experience.
Sweet and Tangy Twists
Add 1 tablespoon brown sugar to the flour mixture for a caramelized crust that balances the savory chicken. The sugar enhances browning and adds subtle sweetness that pairs wonderfully with the beer's bitterness. I've found this works particularly well with pale ale rather than lager.
For a tangy-sweet variation, mix 1 tablespoon honey into the egg-beer wash. This creates a sticky, slightly sweet coating that caramelizes beautifully during baking. The result is a crispy exterior with a hint of sweetness that cuts through the richness of the chicken.
Serve with a spicy honey glaze for dipping.
Global Flavor Profiles
Transform this into a Cajun-style dish by adding 1 tablespoon Cajun seasoning (like Tony Chachere's) to the flour mixture. The bold spices create a complex, spicy-savory crust that stands up to rich dipping sauces like remoulade.
For extra authenticity, use dark beer like a stout in the egg wash.
Create an Italian-inspired version by adding 1 tablespoon dried basil and ½ teaspoon red pepper flakes to the flour. Finish with grated Parmesan cheese in the final breading for a cheesy, crispy coating. Serve with a garlic aioli and sun-dried tomato sauce for a true Roman-inspired meal.
Nutrition facts
Frequently asked questions
Why does the recipe call for triple-dredging instead of just one coating?
The triple-dredge technique creates an extra-crispy exterior while keeping the chicken juicy inside. The first flour coating locks in moisture, the egg-beer wash binds everything together, and the final panko-cornstarch mixture delivers that signature shatter-crunch. Skipping any layer risks a soggy or uneven coating.
Can I use sparkling water instead of beer in the batter?
Sparkling water works perfectly and gives a lighter, slightly tangier batter. Just add a splash of lemon juice to mimic beer's acidity. For maximum crispiness, use cold sparkling water—it creates more bubbles that help the coating adhere better.
How do I prevent the chicken from getting soggy in the oven?
Use a wire rack over a baking sheet to allow air circulation underneath, and space pieces 1 inch apart. Also, spray the final coating with oil before baking—this creates a moisture barrier that helps maintain crispiness. Avoid overcrowding the pan, which traps steam.
What's the best way to reheat leftover baked chicken?
Reheat at 350°F for 10-12 minutes on a wire rack (not directly on a tray) to restore crispiness. For extra crunch, broil for 1-2 minutes at the end. Never microwave—it makes the coating rubbery. Store leftovers in an airtight container for up to 3 days.
Can I make this recipe with chicken thighs instead of breasts?
Yes, but adjust the cooking time to 25-30 minutes—thighs are thicker and cook slower. For even results, pound them to ½-inch thickness and increase the oven temperature to 450°F for the last 5 minutes to crisp the coating faster.