
Main Courses
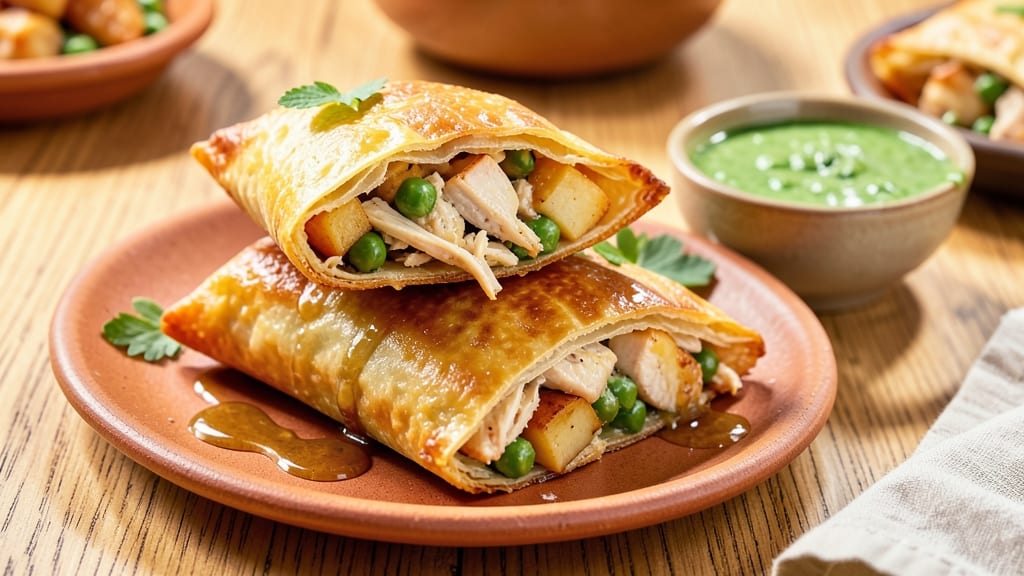
This baked chicken samosa recipe delivers the perfect balance of golden crispy shells and aromatic spiced filling without the fuss of frying. 🔥 The secret lies in a precise dough-to-filling ratio and oven technique that ensures every bite is crispy on the outside while staying tender inside—just like your favorite street vendor version.
What sets this recipe apart is the layered approach: tender chicken simmered in fragrant spices, creamy potatoes, and sweet peas all encased in a delicate, flaky pastry.
The dough gets its signature crispiness from a combination of chilled resting time and high-heat baking, while the filling stays moist thanks to a clever steaming step before assembly.
By the time you pull these samosas from the oven, you'll have perfectly golden, crispy shells that shatter slightly with each bite, revealing the aromatic, spiced filling inside. The aroma alone—warm spices, garlic, and freshly baked dough—will have everyone gathering around your table.
Serve with tamarind chutney and mint yogurt sauce for the complete experience. Let's get started!
Ingredients for baked chicken samosa
Golden shells and spiced filling—just these ingredients transform your oven into samosa magic.
| Ingredient | Amount | Notes |
|---|---|---|
| Boneless, Skinless Chicken Thighs 🍗 | 1 ½ lb | Cut into bite-sized pieces |
| Russet Potatoes 🥔 | 2 medium | Peeled and diced small |
| Frozen Peas 🌿 | 1 cup | No need to thaw |
| All-Purpose Flour 🌾 | 3 cups | Plus extra for dusting |
| Unsalted Butter 🧈 | ½ cup | Cold, cubed for dough |
| Ghee or Vegetable Oil 🫒 | ¼ cup | For filling and dough |
| Garlic Cloves 🧄 | 6 cloves | Minced for filling |
| Fresh Ginger 🌿 | 1 tbsp | Grated finely |
| Green Chilies 🌶️ | 2 whole | Finely chopped |
| Ground Cumin 🌿 | 1 tsp | Toasted lightly |
| Ground Coriander 🌿 | 1 tsp | Freshly ground preferred |
| Turmeric Powder 🌶️ | ½ tsp | Bright yellow color |
| Garam Masala 🌶️ | 1 tsp | Store-bought blend works |
| Salt 🧂 | 1 ½ tsp | Adjust to taste |
| Lemon Juice 🍋 | 1 tbsp | Freshly squeezed |
| Cold Water 💧 | ½ cup | For dough consistency |
| Ice Cubes ❄️ | 1 cup | For chilling dough |
The potatoes and peas are the secret to that creamy, melt-in-your-mouth filling. Russet potatoes hold up best when diced small—Yukon Gold works too, but they'll turn slightly translucent. Frozen peas? Perfect—they steam in the filling and keep it moist. For the dough, King Arthur flour or Bob's Red Mill gives the best texture, but any all-purpose works. The butter needs to be cold when cutting into the flour—use your freezer for 15 minutes if your kitchen's warm. And trust me, ghee is worth the splurge for that authentic flavor.
No ghee? Vegetable oil or coconut oil works in a pinch. Short on green chilies? Jalapeños at half the amount add heat without changing the flavor profile. The garam masala is non-negotiable here—MDH or Everest blends are the gold standard, but any good store-bought blend does the trick. For the dough, if it feels too sticky, add 1 tbsp more flour. Too dry? 1 tsp more water. The key is handling it as little as possible—keep it chilled until ready to roll. And that lemon juice? Freshly squeezed brightens up the whole filling.
The filling keeps 4 days in the fridge, but the dough must be used within 2 days—it dries out fast. Wrap dough pieces in plastic and store between parchment paper. For the filling, portion into small containers and freeze for up to 3 months. Pro tip: make the filling first, then the dough—it gives you time to chill everything properly. And if you're making these ahead, bake from frozen—just add 10 minutes to the baking time. The aroma alone will have your whole house smelling like a street vendor stall.
Why You'll Love This Recipe
- No-Fuss Prep: I swear by this recipe because it’s the kind of meal where you can chop while watching TV. The potatoes go in raw, the chicken cooks through perfectly, and the peas? Just toss in frozen—no peeling, no fuss.
- Crispy-Creamy Magic: That golden crust from the butter and flour? It’s everything with the tender chicken inside. Honestly, the first time I bit in, I thought, “Why haven’t I been doing this all along?”
- Weeknight or Party: Serve it as a snack with chutney, a main with rice, or even in lunchboxes. Between us, my kids ask for it more than pizza—(yes, even on a Tuesday night).
- Budget Win: Chicken thighs and potatoes stretch for days, and the dough uses basic flour. I’ve made this for six people for under $15, and it’s still the star of the table.
Step-by-step instructions for baked chicken samosa
Here's how to create those irresistible golden shells with a spiced filling that's always perfect.
👨🍳 Step 1: Prepare the Spiced Chicken Filling
Heat the 0.25 cup ghee or vegetable oil in a large pan over medium heat. Add the 1.5 lb boneless, skinless chicken thighs cut into bite-sized pieces and cook until no longer pink (8-10 minutes). Remove from heat and set aside.
In the same pan, add 6 cloves minced garlic, 1 tbsp finely grated ginger, and 2 whole finely chopped green chilies. Sauté for 30 seconds until fragrant. Add 2 medium diced russet potatoes and cook for 5 minutes until slightly softened. Stir in 1 tsp toasted ground cumin, 1 tsp ground coriander, 0.5 tsp turmeric powder, 1 tsp garam masala, and 1.5 tsp salt. Mix well and cook for another 5 minutes.
Add the cooked chicken back to the pan along with 1 cup frozen peas and 1 tbsp lemon juice. Cook for 2-3 minutes more until everything is well combined. Let the filling cool completely before using—this prevents the shells from steaming instead of baking.
👨🍳 Step 2: Make the Samosa Dough
In a large mixing bowl, combine 3 cups all-purpose flour and 1.5 tsp salt. Cut in the 0.5 cup cold cubed unsalted butter using a pastry cutter or your fingers until the mixture resembles coarse crumbs with pea-sized butter pieces remaining.
Add 0.5 cup cold water gradually while mixing with a fork until the dough just comes together. Avoid overworking it—you want a smooth but slightly crumbly dough that holds together when pressed. Wrap the dough in plastic wrap and refrigerate for 30 minutes.
While the dough rests, prepare an ice bath by filling a bowl with 1 cup ice cubes and 1 cup cold water. This will help keep the dough cool as you work with it, which is crucial for crispy samosas.
🥘 Step 3: Assemble and Shape the Samosas
Divide the chilled dough into 8 equal portions (about 1.5 oz each) and roll each into a 6-inch circle on a lightly floured surface. Keep the remaining dough covered to prevent drying. Here's the thing—don't stretch the dough or it'll tear when you fold the samosas.
Place 2 tbsp of the chicken filling near one edge of each dough circle. Fold the dough over the filling to form a half-moon shape, then seal the edges by pressing firmly with your fingers. Use a fork to crimp the edges and create that classic samosa design. Place the assembled samosas on a parchment-lined baking sheet.
Brush the tops with a little 0.25 cup ghee or vegetable oil (mixed with 1 tbsp water) for extra crispiness. Arrange them 1 inch apart to allow for even baking. I like to make them in two batches if I'm baking more than 4 at a time.
🔥 Step 4: Bake to Golden Perfection
Preheat your oven to 400°F for 15 minutes to ensure it's fully heated. Bake the samosas for 20-25 minutes until they're deep golden brown and crispy. You'll know they're done when you hear that satisfying crackling sound and see the edges starting to turn golden.
Here's where it gets tricky—don't overbake! The samosas will continue cooking slightly as they cool. Remove them from the oven when they're just barely golden and still slightly soft to the touch. Let them cool on a wire rack for 5 minutes before serving.
For maximum crispiness, serve immediately while they're still hot. The contrast of the crispy shell with the warm, spiced filling is what makes these samosas irresistible. Store any leftovers in an airtight container for up to 2 days, but I promise they won't last that long!
Pro Tips For Making Baked Chicken Samosa
- PRE-COOK THE POTATOES: Boil or microwave the russet potatoes first—partially cooked until just fork-tender (about 8-10 minutes in boiling water). This ensures they hold their shape when baking and don’t turn to mush in the filling. I learned this the hard way after making a soggy disaster the first time.
- SEAR THE CHICKEN FIRST: Brown the chicken thighs in a hot pan with oil before baking—even if you’re skipping the stovetop step, this adds depth. A quick 3-4 minutes per side (until golden) makes the filling taste richer. Sounds like extra work, but it’s worth it.
- DRAIN THOSE PEAS: Thaw and drain the frozen peas completely before mixing into the filling. Extra moisture turns the samosa dough into a chewy mess. Pat them dry with a paper towel—yes, even if they look fine.
- CHILL THE FILLING: Let the chicken-potato-pea mixture cool for 15-20 minutes before assembling. Warm filling expands and leaks through the dough, making a sticky, unappetizing package. Patience here saves cleanup later.
Storing and reheating your baked chicken samosa
Fridge Storage Tips
Store your baked samosas in an airtight container at 40°F or below for up to 2 days. Let them cool completely before sealing to prevent condensation, which can make the shells soggy.
I like using glass containers with tight lids—they keep the samosas crispier longer than plastic. Place a paper towel on top to absorb any excess moisture. 💫
Freezer-Friendly Method
For longer storage, freeze unbaked samosas on a parchment-lined tray for 1 hour before transferring to a freezer bag. This prevents sticking. Bake straight from frozen at 400°F for 30-35 minutes—just add 10 extra minutes to the baking time.
The filling stays just as flavorful, and the shells crisp up beautifully. Label bags with the date to track freshness.
Reheating for Crispy Shells
Revive samosas in a 400°F oven for 5-8 minutes until golden and crispy again. For a quick fix, use the air fryer at 375°F for 3-4 minutes, shaking halfway.
Avoid the microwave—it turns the shells rubbery. If reheating from frozen, add 2 extra minutes to ensure even cooking. Serve with mint chutney to cut through any potential dryness. ✨
Make-Ahead Filling
Prepare the filling 2 days ahead and store it in an airtight container in the fridge. The flavors deepen overnight! When ready to bake, assemble samosas with cold filling and dough straight from the fridge—this ensures crispy shells.
For extra convenience, portion filling into 1-tbsp servings in small containers before refrigerating. 🌟
Dough Preservation
Wrap unused dough tightly in plastic wrap and refrigerate for up to 2 days. For longer storage, divide into 1-oz balls, freeze on a tray, then transfer to a freezer bag. Thaw in the fridge overnight before using.
Chilled dough is key—never let it warm up before rolling, or the shells won’t crisp properly. I keep a small bowl of ice water nearby to dip my fingers in while shaping. ❄️
Nutrition facts
Frequently asked questions
Can I make these samosas without ghee?
Replace ghee with vegetable oil or coconut oil for the filling and dough. For extra crispiness, use neutral oil like canola or sunflower oil when brushing the tops before baking. The flavor won't be identical, but the texture will still be fantastic.
Why did my samosa shells turn out pale instead of golden?
Pale shells usually mean the dough wasn't chilled enough before baking. Always keep the dough refrigerated until ready to roll, and brush the tops with oil mixed with water (not just oil) for that signature golden color. Bake at 400°F for the full 20-25 minutes—don't rush it!
Can I use chicken breast instead of thighs?
Yes, but chicken breast is leaner and dries out faster. For best results, marinate the breast pieces in 1 tbsp lemon juice and 1 tsp garam masala for 30 minutes before cooking. Use 1.25 lb instead of 1.5 lb to account for the smaller yield. Cook at medium-low heat to prevent overcooking.
How do I make these samosas spicier?
Add 1 extra green chili (finely chopped) to the filling, or sprinkle ½ tsp cayenne pepper with the spices. For heat without dryness, mix 1 tsp red chili powder into the filling. Balance the spice with 1 extra tbsp lemon juice to keep the flavors bright. Adjust to taste—samosas should be flavorful, not overwhelming!
What's the best way to serve these baked samosas?
Pair them with tamarind chutney (sweet-tangy) and mint yogurt sauce (cooling) for the full experience. Serve with hot chai tea or mango lassi to balance the spices. For a hearty meal, add cucumber raita or a simple green salad on the side.