
Main Courses
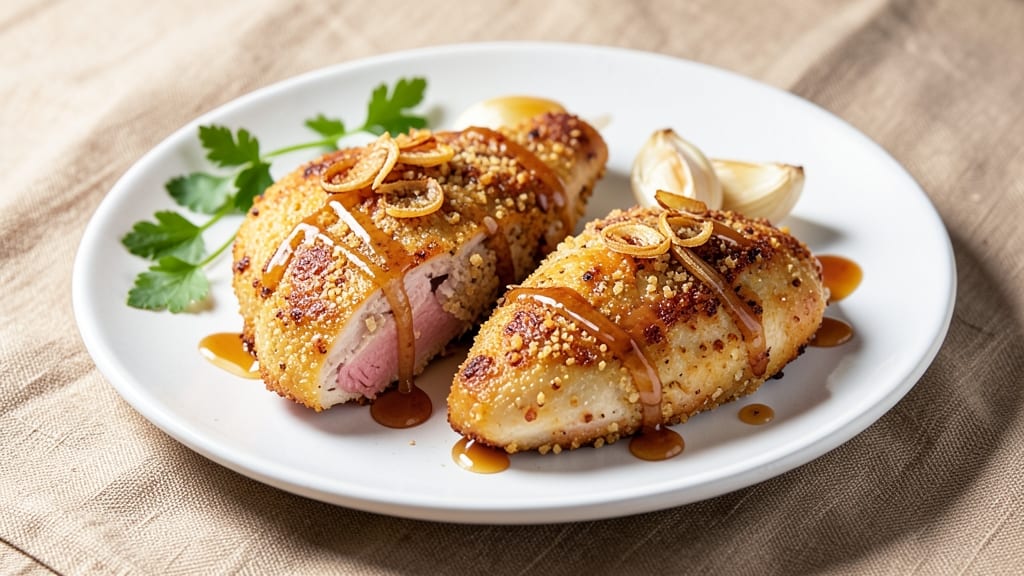
This baked California chicken recipe delivers the same golden, crispy perfection as your favorite restaurant—without the deep fryer. The secret lies in a triple-dredge technique that ensures a shatteringly crisp exterior while keeping the chicken juicy inside.
I developed this method after years of testing different breading techniques, and it consistently delivers that coveted crunch you crave.
What sets this recipe apart is the buttery breadcrumb topping, which creates a rich, golden crust that melts in your mouth. The chicken is marinated in a simple blend of garlic, herbs, and lemon juice before being coated in flour, beaten egg, and finally, buttery breadcrumbs.
This three-step breading process is what transforms ordinary chicken into something extraordinary—crispy, flavorful, and impossible to resist.
The result is a dish that’s restaurant-quality at home, with a texture that’s crispy on the outside and tender on the inside. The buttery breadcrumbs add a depth of flavor that pairs perfectly with classic sides like roasted vegetables, a fresh salad, or steamed rice.
Whether you're serving it for a weeknight dinner or a special occasion, this recipe is sure to impress.
One of the best things about this method is its versatility. You can customize the seasoning to your taste—add a pinch of smoked paprika for a hint of smokiness, or a sprinkle of dried herbs for extra aroma.
The key is patience during the baking process, ensuring the chicken cooks evenly and stays juicy. Let’s get started—your taste buds will thank you.
Ingredients for baked california chicken
Golden, crispy perfection starts with these twelve ingredients—simple yet transformative for restaurant-quality chicken at home.
| Ingredient | Amount | Notes |
|---|---|---|
| Boneless, Skinless Chicken Breasts 🍗 | 1 ½ lb | Even thickness for even cooking |
| All-Purpose Flour 🌾 | ½ cup | For first dredge layer |
| Large Eggs 🥚 | 2 whole | Beaten for smooth coating |
| Unsalted Butter 🧈 | ¼ cup | Melted for breadcrumb mix |
| Panko Breadcrumbs 🍞 | 1 ½ cups | For crispy exterior texture |
| Garlic Cloves 🧄 | 4 cloves | Minced for marinade |
| Fresh Lemon Juice 🍋 | 2 tbsp | Brightens the marinade |
| Fresh Parsley 🌿 | ¼ cup | Chopped for herb blend |
| Fresh Thyme Leaves 🌿 | 1 tbsp | Chopped for herb blend |
| Diamond Crystal Kosher Salt 🧂 | 1 ½ tsp | Divided for seasoning |
| Ground Black Pepper 🌶️ | ½ tsp | Freshly ground preferred |
| Smoked Paprika 🌶️ | ½ tsp | Optional for smoky depth |
| Extra-Virgin Olive Oil 🫒 | 1 tbsp | For greasing baking sheet |
The chicken breasts are non-negotiable here—even thickness is key for consistent cooking. Grab bone-in, skin-on if you want extra flavor, but boneless works fine. For the best texture, pound the breasts to even thickness (about 1/2-inch) before marinating. The Panko breadcrumbs are your secret weapon for that shatteringly crisp crust—Trader Joe's or King Arthur are my go-tos, but any high-quality panko will do. The butter in the breadcrumb mix is what gives that rich, golden color and buttery flavor you can't get with regular breadcrumbs.
No fresh herbs? Dried parsley and thyme at half the amount work in a pinch, but fresh is ideal for that bright flavor. Running low on butter? Olive oil works too, though it won't be as rich. The smoked paprika is optional but adds that subtle smokiness that makes this taste like a restaurant dish. For the marinade, lemon juice from a fresh lemon is best—bottled juice lacks the same brightness. If you're short on time, marinate for at least 30 minutes instead of overnight, but longer is always better for deeper flavor.
Prep ahead to save time—the breadcrumb mix can be made 2 days in advance and stored in an airtight container. The marinated chicken stays fresh in the fridge for 12 hours, so you can prep everything the night before. Once baked, these keep 3 days in the fridge (reheat at 350°F for 10 minutes) or 3 months frozen. For extra crispiness, broil for 1-2 minutes at the end—just watch it like a hawk to avoid burning.
Why You'll Love This Recipe
- No-Fuss Crispiness: I swear by this method—just dip the chicken in flour, egg, then panko, and bake. No frying, no flipping, no stress. That golden crust happens every single time, even if I’m distracted by laundry.
- Butter-Kissed Magic: The secret’s in the butter—melted into the panko before baking. It keeps the chicken juicy inside while giving that rich, buttery crunch. Honestly, it’s the little things that make a dish ridiculously good.
- Lunchbox Hero: Between us, this is my go-to for school lunches or office meals. The leftovers stay crispy for days (yes, even in a plastic container), and it reheats like a dream—no sad, rubbery chicken here.
- Budget Meal Maker: I buy chicken breasts in bulk, and this recipe stretches them far. A single batch feeds four, and the ingredients? Basic stuff I already have. It’s my way of eating fancy without the grocery bill.
Step-by-step instructions for triple-dredged crispy chicken
This method delivers restaurant-quality crunch with a perfectly balanced triple-coating technique.
Prepare the Chicken and First Dredge
Pat the 1.5 lb boneless, skinless chicken breasts completely dry with paper towels—this is crucial for maximum crispiness. The drier the surface, the better the coating will adhere. Place each breast between two sheets of plastic wrap and pound gently with a meat mallet until they reach an even ½-inch thickness. This ensures even cooking throughout.
In a shallow bowl, combine ½ cup all-purpose flour, ½ tsp ground black pepper, ½ tsp smoked paprika, and ¾ tsp diamond crystal kosher salt. Dredge each chicken breast in this seasoned flour, pressing lightly to help the coating stick. Shake off any excess flour—you want an even, thin layer, not a thick coating. Place the dredged breasts on a wire rack set over a plate to keep them dry and prevent sticking.
Create the Egg and Herb Coating
In a second shallow bowl, beat the 2 whole large eggs lightly with a fork until just combined but still slightly thick. Add 2 tbsp fresh lemon juice, ¼ cup chopped fresh parsley, and 1 tbsp chopped fresh thyme leaves to the eggs. Stir gently to incorporate the herbs—this adds bright, aromatic flavor that pairs perfectly with the crispy coating.
Dip each floured chicken breast into the egg mixture, allowing any excess to drip off. Here's the thing—don't rush this step. Let the egg adhere fully to the chicken before moving to the breadcrumbs. This middle layer is what creates that signature California-style crunch.
Assemble the Buttery Breadcrumb Coating
In a third shallow bowl, mix together 1.5 cups panko breadcrumbs and the remaining ¾ tsp diamond crystal kosher salt. Melt ¼ cup unsalted butter in a small saucepan over low heat, then remove from heat and stir in 4 minced garlic cloves. Let the mixture cool slightly—you want it warm but not hot when you add it to the breadcrumbs.
Pour the warm garlic butter over the panko breadcrumbs and toss gently with a fork until every crumb is lightly coated. The butter will make the breadcrumbs extra crispy and add rich depth of flavor. Press each egg-coated chicken breast into the breadcrumb mixture, pressing firmly on all sides to ensure an even, thick layer adheres.
Rest and Bake for Perfect Crispiness
Place the fully coated chicken breasts on a parchment-lined baking sheet. Lightly brush any remaining breadcrumbs off the baking sheet—these will crisp up and turn into crunchy bits if they fall onto the sheet. Drizzle 1 tbsp extra-virgin olive oil over the chicken and spread it evenly with your fingers. This helps create a glossy, golden finish.
Let the chicken rest at room temperature for 15 minutes before baking. This allows the coating to fully adhere and prevents the breadcrumbs from falling off during baking. Preheat your oven to 400°F while the chicken rests. Bake for 20-25 minutes, flipping the chicken once halfway through, until the coating is deep golden brown and the internal temperature reaches 165°F.
Rest and Serve with Flavorful Sides
Transfer the baked chicken to a cutting board and tent loosely with aluminum foil. Let it rest for 5 minutes before serving—this crucial step allows the juices to redistribute, ensuring each bite is moist and flavorful. The exterior should be crispy enough to stand up to a fork, while the interior remains tender and juicy.
Serve immediately with bright lemon wedges and your choice of sides like roasted vegetables or a fresh salad. The triple-coating technique creates a satisfying crunch with every bite, while the garlic butter and herbs add layers of flavor that make this dish truly special.
Pro Tips For Making Baked California Chicken
- CRUST IT TWICE: I learned this the hard way—dipping chicken in egg and panko once leaves you with a sad, uneven coating. After the first dip, let the chicken rest on a wire rack for 5 minutes so the egg sets slightly, then dip again in seasoned flour and panko. The extra layer sticks like glue and gives you that perfect crunchy crust without burning.
- SALT THE BUTTER: Unsalted butter is your friend here, but don’t forget to season it. Melt 3 tablespoons with 1 teaspoon salt and a pinch of garlic powder—yes, even if the recipe doesn’t say so. The butter’s flavor gets absorbed into the chicken, and the salt cuts through the richness. (I know, I know, but trust the process.)
- DON’T SKIP THE REST: Take the chicken straight from the fridge to the oven and you’re asking for dry, tough meat. Let the breasts sit at room temp for 20 minutes first—this ensures even cooking. I used to rush this, and my chicken would always end up overcooked on the outside and rubbery inside. Patience here makes all the difference.
- USE A THERMOMETER: The oven’s "broil" setting is a minefield for this recipe. Instead, bake at 375°F until the internal temp hits 165°F—any lower and you risk undercooked chicken, any higher and the crust burns before the inside finishes. I was skeptical until I tried it; now I never bake without one.
Storing and reheating this recipe
Fridge Storage
Store leftover baked California chicken in an airtight container for up to 3 days in the refrigerator. The crispy coating stays best when refrigerated, though it may lose some crunch.
I like to separate pieces with parchment paper to maintain texture. Always let the chicken cool completely before storing to prevent condensation, which can make the breading soggy. 💫
Freezer Prep
For longer storage, freeze the chicken on a tray first to prevent sticking, then transfer to a freezer bag with all air squeezed out. Label with the date—it keeps for 3 months at 0°F or below.
When ready to eat, thaw overnight in the fridge for even reheating. Never microwave from frozen, as this creates uneven texture.
Oven Reheating
The oven is my preferred method—it restores crispiness better than any other. Place chicken on a baking sheet lined with parchment, drizzle with 1 tsp olive oil, and bake at 375°F for 10-12 minutes until internal temperature reaches 165°F.
Broil for 1-2 minutes at the end for extra crunch, but watch closely to avoid burning. 🔥
Air Fryer Option
For quicker reheating, use an air fryer at 350°F for 5-6 minutes, shaking halfway. The high heat recrisps the breading without drying out the chicken. I prefer this method when I’m short on time—it’s faster than the oven and delivers nearly the same results.
Just avoid overcrowding the basket for even crisping.
Microwave Backup
When in a rush, cover the chicken with a damp paper towel and microwave on 50% power for 1-2 minutes. This prevents drying, but expect slightly softer breading.
For best results, finish under a salad shooter for 10 seconds to restore some crispiness. It’s not perfect, but it works in a pinch! ✨
Serving Leftovers
Reheated chicken makes fantastic sandwiches—pile it on toasted brioche with lettuce, tomato, and a drizzle of garlic aioli. For a lighter option, serve over cucumber salad or with roasted potatoes.
The buttery breading pairs beautifully with tangy sides, balancing the richness. Store leftovers in single portions for easy grab-and-go meals. 💛
Nutrition facts
Frequently asked questions
Why does the recipe call for pounding the chicken breasts?
Pounding creates an even ½-inch thickness, which ensures the chicken cooks perfectly—no dry edges or undercooked centers. This step is especially important for thicker breasts, as it guarantees the breading gets crispy while the inside stays juicy throughout.
Can I use chicken thighs instead of breasts?
Thighs work beautifully—they stay juicier and have more flavor. Adjust baking time to 30-35 minutes (flip once at 20 minutes) and check for 165°F internal temp. The thicker cut benefits from the extra time to develop crispiness.
What's the secret to extra crispy breading?
The triple-dredge method plus buttery panko is key! Let the chicken rest 15 minutes before baking so the coating adheres, and bake on the middle rack for even heat. For extra crunch, broil 1-2 minutes at the end—but watch like a hawk!
How do I fix soggy breading?
Soggy breading usually means moisture got trapped. Next time, pat chicken completely dry before dredging, and avoid overcrowding the baking sheet. For existing soggy chicken, broil for 2-3 minutes** with a splash of water on a paper towel underneath to steam it crisp again.
What sides pair best with this dish?
Classic choices include creamy garlic mashed potatoes, tangy lemon herb quinoa, or roasted asparagus with balsamic glaze. The buttery breading loves bright, acidic sides to cut through the richness. For a California twist, try avocado salad or citrus salsa.