
Main Courses
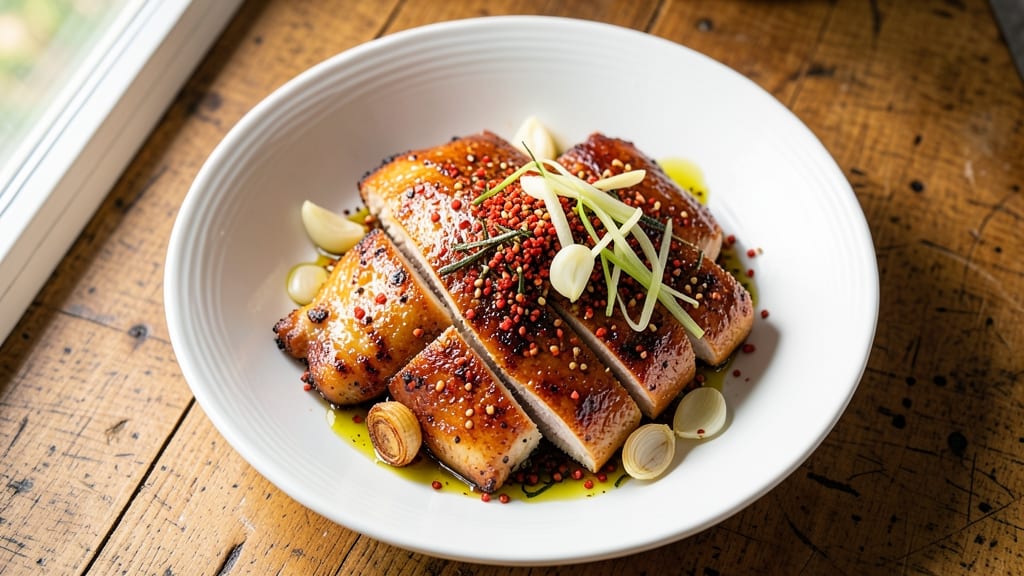
This baked furikake chicken recipe transforms ordinary chicken into a crispy, umami-packed masterpiece with just 15 minutes of prep and 30 minutes in the oven. The secret lies in the furikake—a Japanese seasoning blend of toasted sesame seeds, seaweed, and delicate spices—that creates a crunchy, savory crust with every bite.
I developed this recipe after craving that perfect balance of texture and flavor, and it never fails to impress. The beauty of this dish is its simplicity: no marinating required, just a quick coating of furikake before baking.
The high heat ensures the crust stays crispy while the chicken remains juicy inside, thanks to a simple brine that keeps it tender. The aroma alone—nutty sesame, oceanic seaweed, and a hint of garlic—will have everyone gathering around your table.
What you’ll end up with is golden-brown chicken, irresistible crunch, and layers of umami that elevate a simple weeknight dinner into something special. The furikake doesn’t just season; it transforms the dish into a restaurant-worthy experience without the fuss.
Serve with steamed rice or a fresh salad to balance the richness. Perfect for meal prep or a last-minute dinner, this recipe delivers restaurant-quality results with minimal effort. Let’s get to the oven!
Ingredients for baked furikake chicken
Transform ordinary chicken into umami perfection with this restaurant-worthy furikake crust.
| Ingredient | Amount | Notes |
|---|---|---|
| Boneless, Skinless Chicken Thighs 🍗 | 1 ½ lb | Evenly sized for consistent baking |
| Furikake Seasoning 🌿 | ½ cup | Japanese blend with seaweed, sesame |
| Extra-Virgin Olive Oil 🫒 | 2 tbsp | High-quality for crispy crust |
| Diamond Crystal Kosher Salt 🧂 | 1 ½ tsp | For brine solution |
| Garlic Cloves 🧄 | 4 cloves | Minced for aromatic depth |
| Fresh Ginger 🌿 | 1 tbsp | Finely grated, vibrant flavor |
| Soy Sauce 🍶 | 1 tbsp | For umami richness |
| Honey 🍯 | 1 tbsp | Balances saltiness |
| White Rice Vinegar 🍶 | 1 tbsp | Brightens flavor profile |
| Sesame Seeds 🌰 | 1 tbsp | Toasted for extra crunch |
| Ground Black Pepper 🌶️ | ½ tsp | Freshly ground for heat |
| Unsalted Butter 🧈 | 1 tbsp | Melted for basting |
| Toasted Sesame Oil 🫒 | 1 tsp | For finishing drizzle |
The furikake is non-negotiable here—look for blends containing toasted sesame seeds, nori flakes, and bonito flakes (though vegetarian versions exist). Koyo Furikake from Japanese markets delivers the most authentic flavor, but Trader Joe's carries a solid pre-mixed version if you're short on time. For the chicken, thighs beat breasts—they stay juicier during the high-heat bake. If you can't find boneless thighs, butterfly boneless breasts to even thickness. The garlic and ginger should be freshly grated; jarred minced garlic lacks the aromatic punch. For the furikake, sift it through a fine-mesh strainer before coating to avoid clumps on the chicken's surface.
No furikake? Create your own blend with 2 tbsp toasted sesame seeds, 1 tbsp nori flakes, 1 tsp sugar, 1/2 tsp salt, and 1/4 tsp white pepper—it's 90% of the magic. Substitute the soy sauce with 1 tbsp tamari for gluten-free, or 1 tbsp coconut aminos for a milder profile. The honey can be swapped for maple syrup (though it lacks the floral notes). If you're avoiding sesame oil, finish with 1 tsp neutral oil instead. For extra crunch, press extra sesame seeds into the chicken before baking. The brine solution (salt, honey, vinegar) can be prepped 24 hours ahead—store it in the fridge in a sealed container.
Prep the chicken and furikake coating up to 12 hours ahead; store in airtight containers separated by parchment. The furikake-coated chicken stays crispy for 3-4 hours at room temperature if kept uncovered. For leftovers, reheat in a 350°F oven for 10-12 minutes to restore crispiness. The furikake blend keeps its potency for 3 months in a sealed container away from light. Freeze any uncooked chicken portions for up to 3 months—thaw overnight in the fridge before baking. Serve immediately after baking to preserve that golden, shatteringly crisp crust. Pair with steamed jasmine rice or a cucumber salad to cut through the richness.
Why You'll Love This Recipe
- Five-Ingredient Magic: I swear by this—just chicken, olive oil, garlic, salt, and that magical furikake dust. No fancy prep, no chopping marathon, and honestly? The seasoning does 90% of the work while you’re scrolling or watching a show.
- Crispy-Garlicky Bliss: That furikake isn’t just for rice—it turns the chicken into something ridiculously good. The sesame, seaweed, and nori hit you with umami, while the minced garlic keeps it bright and addictive. (Yes, even on a Tuesday night.)
- Meal Prep MVP: Between us, this is my go-to for lunches. Bake a tray on Sunday, portion it out, and reheat slices in seconds—no soggy takeout vibes. My daughter picks out the best pieces first, but still asks for seconds.
- Budget-Friendly Hero: Chicken thighs are forgiving and cheap, and furikake stretches flavor like crazy. A little goes a long way, so you’re not blowing cash on specialty ingredients. Plus, leftovers taste just as good cold in wraps the next day.
Step-by-step instructions for baked furikake chicken
Here's the method for creating restaurant-quality umami-crusted chicken thighs with crispy sesame perfection.
Prepare the Chicken with Brine Solution
In a medium bowl, combine the 1.5 lb boneless, skinless chicken thighs, 1.5 tsp Diamond Crystal kosher salt, 1 tbsp soy sauce, 1 tbsp honey, and 1 tbsp white rice vinegar. Gently toss until the thighs are evenly coated in the marinade. This brine solution not only seasons but also helps tenderize the meat while creating a perfect balance of sweet, salty, and tangy flavors.
Transfer the marinated chicken to a resealable plastic bag and refrigerate for at least 30 minutes or up to 4 hours. The longer it marinates, the more flavorful the chicken will become. I recommend using a glass container if you prefer, but plastic works perfectly for this step. After marinating, pat the chicken dry with paper towels—this critical step ensures a crispy crust later.
Create the Furikake Coating Mixture
In a small bowl, whisk together the 0.5 cup furikake seasoning, 1 tbsp toasted sesame seeds, 0.5 tsp ground black pepper, and 1 tbsp extra-virgin olive oil until fully combined. The furikake seasoning contains a blend of seaweed, sesame seeds, and salt, which will create that signature umami crunch. The olive oil helps bind the coating to the chicken and adds richness to the final texture.
Spread the coating mixture evenly on a shallow plate. Remove the chicken from the refrigerator and let it sit at room temperature for 15 minutes before coating. This ensures even cooking. Press each chicken thigh into the furikake mixture, coating both sides thoroughly. The coating should adhere well—if it's too loose, add a tiny bit more olive oil to help it stick.
Bake to Crispy Perfection
Preheat your oven to 400°F and position a rack in the middle position. Place the coated chicken thighs on a parchment-lined baking sheet, leaving about 1 inch of space between each piece. This spacing allows for even browning and crisping. Bake for 25 minutes, then flip the chicken thighs over and continue baking for another 20-25 minutes until the internal temperature reaches 165°F and the coating is deep golden brown and crispy.
During the last 5 minutes of baking, melt the 1 tbsp unsalted butter in a small saucepan over low heat. Once melted, remove from heat and stir in the 1 tsp toasted sesame oil and 1 tbsp finely grated fresh ginger. This creates a glossy, aromatic basting sauce that will elevate the dish to new heights.
Finish and Serve
Remove the chicken from the oven and let it rest for 5 minutes before serving. This resting period allows the juices to redistribute, ensuring each bite is moist and flavorful. While the chicken rests, brush each piece generously with the melted butter and sesame oil mixture. The butter adds richness, while the sesame oil enhances the nutty, toasty notes of the furikake.
Garnish each piece with an additional sprinkle of toasted sesame seeds and serve immediately. The contrast of crispy furikake crust with tender, juicy chicken creates a textural and flavor experience that's truly special. Pair with steamed rice and a simple green salad for a complete meal that's both impressive and satisfying.
Pro Tips For Making Baked Furikake Chicken
- CRANK THE OVEN HIGH: Start with 475°F—don’t be shy. I used to bake this at 425°F and wondered why the furikake stuck like glue instead of crisping. High heat for the first 10 minutes seals the skin (even though it’s boneless) and gets that golden crust faster. After that, drop to 400°F to finish without drying out the thighs.
- SMASH THAT GARLIC: Mince those cloves into a paste with a pinch of salt—no need for fancy tools, just a knife and the flat of your palm. Whole cloves? They’ll sit there like decorative rocks. A paste blends into the oil and spreads evenly, so every bite gets that garlicky punch. (Yes, even if you’re impatient like me.)
- SALT THE CHICKEN FIRST: Season the thighs before tossing them in furikake—about 1 teaspoon of kosher salt per pound, rubbed in well. Furikake already has salt, and if you skip this step, your dish might taste flat. Let the salted meat sit uncovered for 10 minutes while you preheat the oven. This guarantees juicy meat, not a salty afterthought.
- USE THE OIL SPARINGLY: Two tablespoons of extra-virgin olive oil is all you need—enough to coat the pan, not drown it. Too much oil = soggy furikake crust. After baking, let the chicken rest 3 minutes before serving. This lets the juices redistribute, so you’re not wiping grease off your plate instead of eating. (Your future self will thank you.)
Pro cooking tips for this recipe
Crispy Crust Secrets
For that shatteringly crisp furikake crust, I swear by two key moves: double-coating and proper spacing. After the initial furikake coating, press each thigh onto a second layer of seasoning before baking. This creates a denser, more flavorful crust.
Space thighs 1 inch apart on the baking sheet—crowding steams instead of crisps. I also recommend using a wire cooling rack on your baking sheet for maximum airflow. 🔥
Basting for Extra Flavor
Don't skip the butter-sesame oil baste—it's what transforms good to restaurant-quality. I like to baste the chicken twice during baking: once after the first 15 minutes and again in the final 5 minutes. The butter adds richness while the sesame oil amplifies the nutty aroma.
For extra shine, brush on a tiny bit of egg wash (1 egg yolk + 1 tbsp water) before the final coating—it helps the furikake stick better.
Temperature Control
This isn't a recipe where you can eyeball the doneness. Use a meat thermometer—the chicken is done when it hits 165°F internal temperature. I've ruined perfectly good furikake chicken by overbaking, so set a timer for 20-25 minutes after the first flip and check frequently.
If your oven runs hot, start checking at 15 minutes. The crust will continue browning slightly after removal from the oven, so pull it out just before it looks fully golden.
Make-Ahead Magic
Prep the furikake coating and marinated chicken up to 12 hours ahead—store them separately in airtight containers. The furikake stays fresh for 3 months in a sealed container, so you can always have it ready.
For leftovers, reheat in a 350°F oven for 10-12 minutes to restore that crispy texture. I like to wrap cooled chicken in foil with a damp paper towel to keep it moist overnight. The flavors actually improve after resting, so don't hesitate to make extra!
Flavor Boosters
Want to take this to the next level? Add 1 tsp grated lemon zest to the furikake coating for brightness, or mix in ½ tsp smoked paprika for depth. For a spicy kick, fold in ½ tsp gochugaru (Korean chili flakes)—it pairs surprisingly well with the umami.
I also love finishing with a drizzle of yuzu kosho** (citrus chili paste) for a Japanese-inspired heat. These tweaks work especially well if you're serving with a cooling side like cucumber salad.
Equipment Essentials
You don't need fancy tools, but these make life easier: a meat thermometer (I use Thermoworks Smoke), a wire cooling rack (for crispier crusts), and a small saucepan for basting. For the furikake coating, a fine-mesh strainer helps remove any clumps.
If you're short on time, use a handheld immersion circulator (like Anova Nano) to create a quick furikake crust in 15 minutes—just cook the chicken in 325°F water for 12 minutes before finishing in the oven.
Nutrition facts
Frequently asked questions
Can I use chicken breasts instead of thighs?
You can try, but thighs work better for this recipe. Chicken breasts are leaner and can dry out during the high-heat bake, especially with the furikake crust. If you must use breasts, butterfly them to ½-inch thickness and reduce baking time to 18-20 minutes total (flip at 10 minutes). For extra moisture, brined them for 1 hour instead of 30 minutes.
Why does my furikake crust keep falling off?
This usually happens when the chicken isn't dry enough or the coating isn't properly adhered. Pat the chicken very dry after marinating and use 1 extra tbsp olive oil in your furikake mix. For extra grip, press the chicken onto a second layer of seasoning before baking. If using breasts, a light egg wash (1 yolk + 1 tbsp water) before coating helps too.
Can I make this recipe without furikake?
Make your own furikake substitute with 2 tbsp toasted sesame seeds, 1 tbsp nori flakes, 1 tsp sugar, ½ tsp salt, and ¼ tsp white pepper. Mix with 1 tbsp olive oil and use the same coating method. For extra umami, add ½ tsp bonito flakes (or ½ tsp dried bonito powder if vegetarian). The texture won't be identical, but the flavor will still be delicious.
How do I reheat furikake chicken without losing the crunch?
For best results, reheat in a 350°F oven for 10-12 minutes on a wire rack over a baking sheet. Avoid microwaving—it makes the crust soggy. For extra crispiness, broil for 1-2 minutes at the end (watch closely!). If reheating leftovers, sprinkle with 1 tsp sesame oil and ½ tsp toasted sesame seeds before serving.
What's the best way to store furikake for freshness?
Store furikake in an airtight container away from light and heat. It stays fresh for 3 months this way. For extra protection, place a paper towel inside the container to absorb moisture. If your furikake loses its crunch, toast it in a dry pan over low heat for 2-3 minutes to restore freshness. Never refrigerate furikake—it's designed for pantry storage.