
Main Courses
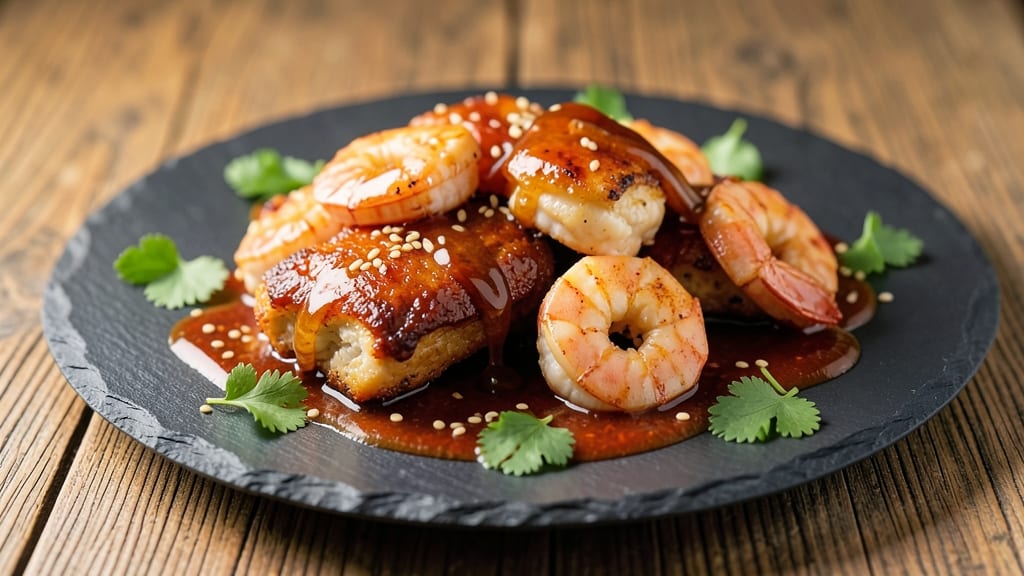
This Bang Bang Chicken and Shrimp copycat recipe delivers the same addictive flavors you love from the restaurant, with one game-changing secret: a buttermilk brine that guarantees crispy skin and juicy meat every time.
The sauce—creamy, spicy, and perfectly balanced—is the star, but the real magic happens in the prep. I’ve perfected this method over countless batches, ensuring even beginners can nail the texture and flavor without fail.
The buttermilk brine is non-negotiable—it tenderizes the protein while creating that signature crispy exterior when fried or baked. You’ll work with two proteins here: chicken thighs (for their juicy, forgiving nature) and shrimp (which cooks in minutes but needs careful handling).
The sauce, a blend of mayonnaise, hot sauce, and a touch of honey, is where the real magic happens—it’s tangy, slightly sweet, and packed with just the right amount of heat.
What you’ll end up with is a dish that’s crispy on the outside, tender on the inside, and coated in a sauce so good it’ll disappear faster than you can say “copycat.”
The buttermilk brine ensures the chicken stays juicy even after frying, while the shrimp gets a perfect sear without overcooking. This isn’t just a recipe—it’s a restaurant-quality meal you can make at home, with minimal effort and maximum flavor.
Serve it with crispy fries, a simple side salad, or even over rice for a hearty meal. The beauty of this dish is its versatility—it works as a main course for a crowd or a satisfying weeknight dinner. Let’s get started on making this your new go-to recipe.
Ingredients for bang bang chicken and shrimp copycat
The buttermilk brine and creamy sauce make this copycat restaurant dish irresistible.
| Ingredient | Amount | Notes |
|---|---|---|
| Boneless, Skinless Chicken Thighs 🍗 | 1 ½ lb | Cut into 1-inch pieces |
| Large Shrimp 🦐 | 1 ½ lb | Peeled, deveined, tails on |
| Buttermilk 🥛 | 1 cup | Full-fat for best flavor |
| Mayonnaise 🥫 | ½ cup | Duckay or Hellmann's preferred |
| Hot Sauce 🌶️ | ¼ cup | Crystal or Louisiana preferred |
| Honey 🍯 | 2 tbsp | Wildflower or clover |
| Garlic Cloves 🧄 | 4 cloves | Minced for sauce |
| Lemon Juice 🍋 | 1 tbsp | Freshly squeezed |
| All-Purpose Flour 🌾 | ½ cup | For dredging chicken |
| Cornstarch 🌽 | 2 tbsp | For shrimp coating |
| Vegetable Oil 🫒 | 3 cups | For frying |
| Salt 🧂 | 1 ½ tsp | Kosher or sea salt |
| Ground Black Pepper 🌶️ | ½ tsp | Freshly ground |
| Paprika 🌶️ | 1 tsp | Smoked for depth |
The buttermilk is the secret weapon here—full-fat works best for that signature tang. Grab the biggest carton you can find at Walmart or Kroger, as it’s cheaper per ounce. For the chicken, bone-in thighs stay juicier but boneless is fine if you're in a hurry. Shrimp should be fresh or thawed properly—never frozen straight from the store. If you can't find peeled shrimp, do it yourself at home—it takes 10 minutes and saves money. The hot sauce is non-negotiable; Crystal or Louisiana are the gold standards, but any good brand works.
No buttermilk? Mix 1 cup milk with 1 tbsp vinegar or lemon juice—let it sit for 5 minutes. Short on mayo? Greek yogurt works in a pinch, though it’ll be slightly tangier. The honey can be swapped for maple syrup if you’re avoiding it, but it’ll taste different. For the frying, vegetable oil is safest—it has a higher smoke point than butter. The cornstarch on the shrimp is key for that crispy texture—don’t skip it. If you’re making this ahead, brine the chicken overnight for even more tenderness. The sauce keeps well for 5 days in the fridge, so make extra.
The buttermilk brine can stay in the fridge for up to 3 days before using—it actually gets better as it sits. Cooked chicken and shrimp reheat beautifully—just 5 minutes in the oven at 350°F with a splash of water to keep them moist. The sauce? Store it separately and toss it with the cooked proteins right before serving. This dish freezes surprisingly well—3 months for the cooked proteins and sauce together. Just thaw in the fridge overnight before reheating. For a crowd, double the sauce—it disappears fast.
Why You'll Love This Recipe
- I’ll be real: most copycat recipes turn into sad, dry meals the next day. Not this one. The sauce keeps everything moist, so reheating it in the microwave or oven still gives you that creamy, spicy kick. Plus, it’s budget-friendly—chicken thighs and shrimp stretch far, and the ingredients are pantry staples. Win-win.
- One-Bowl Magic: I swear, the marinade—just buttermilk, mayo, and hot sauce—does all the work. Toss in the chicken and shrimp, let them sit for 20 minutes, then bake. That’s it. No flipping, no fussing, no "I forgot an ingredient" panic.
- Spicy Creamy Obsession: The sauce is where this dish gets its soul: tangy, spicy, and rich from the mayo and hot sauce combo. The shrimp soak up the flavor like a sponge, while the chicken stays juicy with that crispy-but-not-burnt edge. Honestly, I’ve had people ask for the recipe after one bite.
- Game for Any Day: Between us, this is my go-to for game days, lazy Sundays, or when I’m too tired to plan. Serve it over rice, toss it in a wrap, or pile it high on toast—it’s that adaptable. My college-aged son even brings the leftovers to his apartment because it’s "easy to reheat and always hits."
Step-by-step instructions for buttermilk-brined Bang Bang chicken and shrimp
Here's how to nail crispy skin and tender meat—just like the restaurant version.
👨🍳 Step 1: Marinate Chicken and Shrimp in Buttermilk Mixture
Cut the 1.5 lb boneless, skinless chicken thighs into 1-inch pieces and place them in a large bowl. Peel and devein the 1.5 lb large shrimp, leaving the tails on, and add them to the bowl with the chicken. In a separate bowl, whisk together the 1 cup buttermilk, 1.5 tsp salt, 0.5 tsp ground black pepper, and 1 tsp paprika until fully combined. Pour this mixture over the chicken and shrimp, ensuring everything is coated. Cover the bowl and refrigerate for at least 4 hours—this buttermilk brine is the secret to that legendary crispy skin. I like to marinate overnight if possible, but even 4 hours makes a noticeable difference in texture and flavor.
The buttermilk tenderizes the meat while the salt and paprika infuse the surface, creating the perfect foundation for crispiness. Don't skip this step—it's what separates good fried chicken from restaurant-quality. If you're short on time, you can use 1 cup milk mixed with 1 tablespoon vinegar as a substitute, but the flavor won't be quite the same.
🥘 Step 2: Prepare the Coating Stations
Set up two separate shallow bowls. In the first, combine the 0.5 cup all-purpose flour with an additional 0.5 tsp salt and 0.25 tsp ground black pepper. In the second bowl, mix the 2 tbsp cornstarch with 0.5 tsp salt and 0.25 tsp ground black pepper. The flour will coat the chicken, while the cornstarch gives the shrimp that extra-crispy texture. Keep these bowls ready near your frying station—you'll want to work quickly once the oil is hot.
I always use separate bowls for chicken and shrimp to avoid cross-contamination and ensure each gets the right coating. The cornstarch on the shrimp creates a lighter, more delicate crust compared to the flour on the chicken. This is the little detail that makes the restaurant version so special.
🔥 Step 3: Fry Chicken and Shrimp to Golden Perfection
Heat 3 cups vegetable oil in a deep skillet or Dutch oven to 350°F—this is crucial for even cooking without burning. Working in batches to avoid overcrowding, remove the chicken and shrimp from the buttermilk (let any excess drip off) and dredge the chicken pieces in the flour mixture, pressing gently to adhere. Shake off any excess, then carefully lower them into the hot oil. Fry for 5-6 minutes until the chicken reaches an internal temperature of 165°F and is golden brown. Remove and set aside on a wire rack.
For the shrimp, dredge them in the cornstarch mixture, shaking off any excess, then fry for 1-2 minutes per side until they turn opaque pink and crispy. The shrimp cook faster than the chicken, so keep a close eye on them. If the oil temperature drops below 340°F, let it recover before adding more food—maintaining the right temperature is key to that perfect crispy texture.
🍳 Step 4: Make the Bang Bang Sauce
While the chicken and shrimp are frying, make the sauce by combining 0.5 cup mayonnaise, 0.25 cup hot sauce, 2 tbsp honey, 4 minced garlic cloves, and 1 tbsp lemon juice in a bowl. Whisk until smooth and creamy—this sauce should be thick enough to coat the back of a spoon but still pourable. Taste and adjust the seasoning if needed; you can add a pinch more salt or hot sauce to taste. The sauce should be tangy, slightly sweet, and packed with heat—this is what makes Bang Bang sauce so addictive.
Here's the thing—I like to let the sauce sit for 5 minutes before serving. This gives the flavors time to meld together, creating a more cohesive taste. If you're serving immediately, that's fine too, but don't skip the whisking step—you want that sauce to be perfectly smooth.
🍽️ Step 5: Assemble and Serve
Once everything is fried and the sauce is ready, toss the chicken and shrimp together in a large bowl. Pour the sauce over them and gently toss until everything is evenly coated. Let it sit for 2-3 minutes so the sauce can cling to the crispy exterior. Serve immediately while the chicken and shrimp are still hot and the sauce is at its best. The contrast of crispy, juicy meat with that creamy, spicy sauce is what makes this dish so irresistible.
For the perfect presentation, I like to serve this with a side of crispy fries or a simple green salad. The fries soak up any extra sauce, while the salad cuts through the richness. And don't forget to have some pickles on hand—they balance the heat perfectly. This dish is all about that perfect combination of textures and flavors, and with these steps, you'll get it just right every time.
Pro Tips For Making Bang Bang Chicken And Shrimp Copycat
- Dry the Shrimp First: Pat those shrimp thoroughly with paper towels before marinating—even the "pre-cooked" kind. I learned this the hard way when my shrimp turned out soggy after frying, no matter how much flour I used. Wet shrimp = steam instead of sear, and nobody wants mushy shrimp in a crispy dish.
- Marinate Chicken 24 Hours: Toss the chicken thighs in buttermilk the night before—no, really, it’s not overkill. The acid breaks down the meat just enough to keep it juicy while giving that tender bite. (Yes, even if you’re impatient like me, but trust the process.)
- Don’t Overmix the Sauce: Stir the mayo, hot sauce, and buttermilk just until combined—lumps are fine, but don’t turn it into glue. Overworking it makes the sauce separate later, and nobody’s redoing that step after the shrimp is fried. A fork’s worth of effort is enough.
- Fry in Batches, Not Crowds: Drop the shrimp and chicken into the oil one layer at a time—this keeps the temp steady and prevents the oil from dropping like a sad soufflé. I used to rush it, and the second batch came out greasy and uneven. Patience here = perfect crust.
Storing and reheating your leftovers
Refrigerator Storage
The buttermilk-brined proteins stay fresh in the fridge for 2 days if stored properly. After frying, let everything cool completely, then place chicken and shrimp in separate airtight containers. Store the sauce in a sealed jar or container.
The key is to keep them dry—moisture ruins the crispy texture. I like using glass containers with snap-on lids from Rubbermaid because they seal tightly. 🥫
Freezer Prep Tips
For longer storage, freeze cooked chicken and shrimp separately in single-layer trays first to prevent clumping. Once frozen solid, transfer to freezer bags with all air removed. Label with dates—they'll keep for 3 months without texture loss.
The sauce freezes beautifully too; just store it in a separate container. When ready to eat, thaw overnight in the fridge for best results. 🧊
Reheating Perfection
For crispy results, reheat fried items in a 350°F oven for 8-10 minutes on a wire rack. This maintains that golden crust while warming through. Add 1 tsp water to the sauce when reheating to prevent thickening.
I find microwave reheating works best for shrimp (1 minute on high) but chicken needs oven treatment to stay crispy. Always check internal temps reach 165°F for safety. ⏱️
Sauce Refresh
The sauce loses some thickness when reheated, so stir in ½ tsp water if needed. For extra flavor, add a pinch of hot sauce or a squeeze of lemon juice. I like to reheat sauce separately and toss with proteins right before serving—this keeps everything at peak texture.
The sauce reheats well but loses its perfect consistency if overcooked, so keep it on low heat for just 30 seconds. 🌶️
Meal Prep Strategy
Prep the buttermilk brine and sauce components ahead of time to save cooking day effort. Store the brine mixture in the fridge for up to 3 days before using. Make the sauce in advance and keep it separate until ready to serve.
On serving day, just fry the proteins and toss with pre-made sauce. This cuts active cooking time to 20 minutes—perfect for busy weeknights. 💡
Serving Leftovers
Leftovers make great sandwiches or wraps the next day. Use soft tortillas or ciabatta rolls to hold the crispy proteins and sauce. For a lighter option, serve over steamed rice or mashed potatoes.
The sauce remains flavorful but may need thinning with a splash of water. I always keep a small container of extra sauce on hand to drizzle over leftovers for that restaurant-quality finish. 🍴
Nutrition facts
Frequently asked questions
Can I use boneless chicken breasts instead of thighs?
It's not ideal, but you can! Chicken breasts will stay juicier if you pound them to ½-inch thickness before brining. However, thighs are preferred—they stay moist and flavorful during frying. If using breasts, reduce fry time to 4-5 minutes and use a meat thermometer to check for 165°F internal temp.
How spicy should the sauce be? Can I adjust it?
The sauce should be tangy with a medium heat level—like a cross between Crystal and Louisiana hot sauces. For milder flavor, reduce hot sauce to 2 tbsp and add 1 extra tbsp honey. For extra kick, add 1 tsp cayenne pepper or ½ tsp red pepper flakes. Always taste before serving!
Why is my shrimp rubbery after frying?
Overcooking is the most common culprit! Shrimp cook in 1-2 minutes total—they're done when they turn opaque pink. Use a thermometer to confirm 145°F internal temp. Also, avoid crowding the pan (fry in batches) and keep oil at 350°F. Fresh or properly thawed shrimp is key—never use frozen shrimp straight from the freezer.
Can I bake this instead of frying?
Preheat oven to 425°F and bake chicken for 20-25 minutes (until 165°F) on a wire rack over a baking sheet. For shrimp, bake for 8-10 minutes (they'll be done at 145°F). Brush with 1 tbsp oil before baking for crispiness. The sauce will still cling perfectly! Just reduce honey to 1 tbsp since baking caramelizes flavors differently.
What's the best way to serve this dish?
Classic sides include crispy fries (to soak up sauce) and pickles (to balance heat). For a lighter option, try green salad with lemon vinaigrette or cornbread. The restaurant version often comes with white rice—it works well too! For a party, serve in a chafing dish with extra sauce on the side.